Friday 28 December 2012

Keeping Cool

It has been really hot here over the last week or so. Mostly we've been staying indoors where it's air-conditioned. E has lots of new toys to play with, or else she'll draw on her chalkboard or play the piano or watch Play School. On Christmas day it reached 40°C. We were lucky enough to spend some time with friends in their pool. Yesterday we got out of the house for a while and took E to Chipmunks (an indoor play centre). Here she is in the ball-pit:

Perhaps we're all overdoing the air-conditioning, as last night we had a blackout for a few hours. At least it was around sunset, not at the hottest part of the day. It still got hot in here, though. E cooled off with a candle-lit bubble bath.

How's the weather where you are?

-Polly

Monday 24 December 2012

Happy Birthday, E

E is 2! As a big 2-year-old, there's some things that she just MUST do: like wearing pigtails and taking her own lid from her yoghurt tub.

To celebrate, we spent a whole day at Scitech. Then we came home and had a little party,
with blowing out candles:

...eating cake:

...opening presents:

...and playing with balloons:

She wore her new Dora the Explorer party dress, too.

Here's a clearer picture of the cake:

I made it using the instructions in the Women's Weekly "Kids' Party Cakes" book that my sister gave me. I used strawberry packet cake for the body and a chocolate cupcake (recipe from "The Joy of Vegan Baking") for the head. I changed the decorations a bit from the book and I think mine turned out cuter. I gave the ladybug lollipop antennae, malt sticks for legs, piped icing pupils and smile. I also used dark chocolate melts for the spots instead of the suggested 'freckles'.

I think we succeeded in making E's birthday extra special. Thankyou also to all the interstate family who sent gifts in the mail. ^_^

-Polly

Friday 21 December 2012

Playdough

I made up a new batch of playdough recently. For the green, I added what I thought was a lot of peppermint essence to make it smell nice. It still just smells like playdough. Here it is with a picklebums duck puppet and some dried kidney beans:


E called the grey playdough, "moondough", because it looked like the moon when I rolled it into a ball and she does like all things 'space'. I added silver glitter to that one.


I also made blue and yellow. It keeps really well in zip-lock bags in the fridge.

-Polly

Sunday 16 December 2012

Alternatives to a Paintbrush

This week, E had a lot of fun painting with some new techniques.
First, I gave her some empty toilet-paper rolls and some kitchen-sponge paint pallets (ideas both from Mummy Musings & Mayhem). The cardboard rolls make neat circle prints on the paper.


After a while, E decided to get her hands into the paint, too. She even picked up the sponges and did some painting using those.


Another technique that I introduced was this idea from Making Boys Men. It's simply using a balled up plastic bag instead of a paintbrush.


This could also be interesting if you covered the ball with something even more textured like bubble-wrap. I think that all of these paintings would work well as home-made wrapping paper (particularly if we used thinner paper), but really we just did it as a fun activity for E.

-Polly

Friday 14 December 2012

Paper-Plate Jellyfish

Last week E requested that we make a jellyfish. We'd previously done "J is for jellyfish". We did drawing and play-acting and saw some real jelly fish at the aquarium. This was the first time that we actually 'made' one. So here it is. How to make a jellyfish.

Materials (for one jellyfish):

  • 1 paper plate
  • scissors
  • masking tape or double-sided tape
  • paper streamers
  • coloured markers
  • (optional) string

Method:
Cut the paper plate in half. Stick a row of tape (sticky-side up) along the straight edge.

 Tear the streamer into pieces approximately the length you want the tentacles. Stick each piece to the tape. We made 10 tentacles for our jellyfish.

Put some more tape around the outside of the plate.

Stick the other half of the plate on top.

Colour and decorate your jellyfish however you wish.

All done!

You can then add a bit of string to the top if you would like to hang it up. 
E just had fun swirling it around and singing "Two Jellyfish" (we made two).

Happy crafting,
-Polly

Wednesday 12 December 2012

Bugs

Here's some little visitors that we've found in our garden recently:


I'd love a macro lens for our camera. My phone doesn't do such a bad job, though, does it?

-Polly

Monday 10 December 2012

Cherry Festival

We love to take drives "down south". This weekend we headed to the cherry festival in Manjimup. It was good fun, especially for E. Here she is on the bouncy castle:


We were lucky enough to get a turn while there were only a couple of other kids there, kids about her size, too.

Here she is in the petting zoo:

There were lots of stalls selling everything from handicrafts to live yabbies. We saw "Doopa dog" and the vintage cars and E even joined in a circus workshop. She also spent a lot of time on the playground.

We didn't see everything that there was to see, but it didn't matter. We had a good day. :)

-Polly

Thursday 6 December 2012

Icy Hearts

What do we do when it's 40 degrees C outside?
Stay indoors and play with ice. :)


Earlier in the week, we had a couple of really hot days and I thought it would be the perfect time to give E this activity. I coloured some water using food dyes and froze it in a heart-shaped muffin tray. That's it. I put them in a tub with a few ordinary ice cubes. They were a lot of fun to play with.


They were fun to stack.


Some rubber ducks got in on the fun.


When the ice started to melt, it made icky-looking green water. We added some dish-soap bubbles.


I actually refilled the muffin tray and we've done this activity a few times. One batch had glitter added. The glitter wasn't really noticeable until the ice melted. Then we had pretty, glittery water. :)

We also introduced a second tray for transferring the slippery ice to and a strainer-spoon and a few small containers for scooping and filling. Lots of fun for a hot day or two.

How have you been keeping cool?

-Polly

Friday 30 November 2012

Scooping and Sorting

E has been playing with beans. :)


I've seen these sensory tubs all over blog-land and figured it was about time I put one together for E. Although I love all the themed ones that people come up with, I wanted to use what we already had at home and put it together in a short time. So, no theme for us this time. Our tub was filled with dried kidney beans, pom-poms of different sizes and colours, pipe-cleaners curled into spirals, a little fabric heart and bow, a plastic shot-glass, two silicone cupcake liners and two different sized scoops. In the picture, E is scooping beans into the little cup. You may have noticed one of her mo-men there, too. A couple of them got in on the action.


Later, we took the pom-poms from the tub and E did some transferring and sorting. Using kitchen tongs, she moved pom-poms between different bowls and sorted them by size and then by colour. She also got out a wooden spoon and mixed them around, pretending to make a cake (one of the 'bowls' was actually a cake pan). She poured the 'ingredients' into the pan and put it into the 'oven' (a cardboard box). Then she served the pieces back into the bowls. I love watching her imaginary play. :)


A couple of days later, we got out the beans again. This time I set it up as a 'spooning' and transferring activity. All the beans were in one bowl and I gave E the task of using a spoon to transfer them to a second bowl. She was very careful not to spill any, but the roasting tray was perfect for catching any spilled beans and really easy for her to carry, too. When she'd transferred all the beans, she picked up the bowl and poured them back into the original bowl and started again. I guess 'spooning' in the other direction seemed backwards.

-Polly

Monday 26 November 2012

Garden Update

Here's some things that are going on in our little garden.


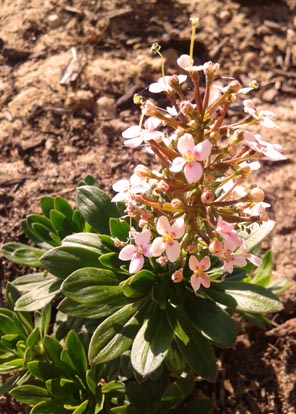
About a week ago, we bought a whole bunch of these stylidium plants from a local plant nursery. We finally gave our front garden a little love and got rid of a lot of weeds and moved some dirt around. We pulled out a couple of sad-looking grassy plants and planted the stylidium along the side of the driveway. It's a shrub native to our area, so hopefully it goes well without too much fuss. The last natives that I tried to grow all died because they were accidentally given the wrong fertiliser. We also added a cute little rosemary bush.

In the back garden, we've added a new lemon tree and lots of mulch. My husband planted a few petunias around the place to give a bit of extra colour and to hopefully attract a few good bugs. We've got these purple ones and some bright pink ones with the same white outline. The last lot of colourful flowers that we planted are still going well, seemingly getting bigger and brighter daily.


We have some veggies ready for picking, like this big kohlrabi. The last lot got made into fritters. Not sure what this one's destined to become.


I also picked a huge beetroot this morning and there's a bush full of (Japanese?) eggplants ready to be used before the grubs find them. Wandering around the garden, we still find little mushrooms popping up in shady places. Here's one taking a bow:


and an onion flower in the same pose:


Something else rather exciting is our first ripe nectarine. Doesn't it look so sweet and juicy? I'm itching to taste it... later, later...


So, obviously, we've been spending a bit of time in the garden over the last couple of weeks (while avoiding the hot sun in the middle of the day). How goes your garden?

-Polly

Thursday 22 November 2012

Mo-Men

November, or "Movember", is a time of year when some men grow extra facial hair to raise awareness for men's health issues. I've seen charity events and fundraisers under the "Movember" banner for issues such as prostate or testicular cancer and men's mental health. Neither E nor I are able to or willing to grow a moustache, but we had a little "mo" fun of our own.


Mo-Men

You will need:

  • 5 empty toilet-paper rolls (or other cardboard tubes)
  • 5 strips of coloured paper, about half the height of the tubes and long enough to go all the way around
  • Coloured pencils
  • This moustache template printed onto paper or thin card (or draw your own)
  • School glue or any craft glue
  • Some yarn, cut into 1-2cm long pieces (we used brown)
  • 5 small pompoms (we used pink)
  • 10 googly eyes


To make:
Using coloured pencils, draw and colour a clothing design onto each strip of coloured paper.
Wrap one strip around each cardboard roll, lining up the bottom edges, and glue in place.
Cut out the moustaches. Coat one side of a moustache with glue. Stick on lots of little pieces of yarn ('hair'). Do this for all 5 moustaches and leave to dry.
Once the glue is dry, stick moustaches into place on the cardboard rolls. Glue on pompom 'noses' and googly eyes.
You now have 5 little "Mo-men".


E began placing the yarn onto the templates one piece at a time, very carefully. She soon realised that it was much easier to pile on handfuls of the stuff. Once they were done, she spent a lot of time playing with her new dolls... they went for a walk along the table and said "hello, hello" a lot. They went for a drive in a shoebox 'car' and found a cardboard box 'house' to live in.

-Polly

Tuesday 20 November 2012

Skinned Knees

E was so excited to go to the park to play some soccer with her new ball that she tripped and grazed her knees before she even got there. It didn't stop her from having a great time at the park. When she got home, we dealt with the skinned knees (and elbow and hands and chin).


Antiseptic cream, bandaids (including some Dora the Explorer ones), surgical tape and lots of shiny stickers. That should fix it. :)

Oh, and she also got some new shoes earlier in the week. Her "shiny shoes," as she calls them.

-Polly

Thursday 15 November 2012

Papercraft

E and I have both been busy with various crafts, many of which I won't be sharing because they were made as gifts that haven't been sent out yet. We don't want to spoil the surprise! Also, we recently bought some new woodworking tools. Yay, another new hobby for me. :)

Some crafts that I will share are some more of the paper toys that I've made. My favourite so far, and the most detailed that I've done, is the caterpillar from Constructing Wonderland by Alex McMenemy:


I've also made a Viking (found here)...


and I've made a rabbit from this set.


For a slightly different papercraft, I found this tutorial for an origami bow and made one as a cute embellishment on a wrapped gift.


-Polly

Thursday 8 November 2012

S is for Snake

The latest picture in our alphabet series is S for Snake. E still enjoys colouring these pictures and will remind me if we haven't done a new one in a while. On the day that we did our S for Snake picture, we did a lot of other snake themed activities, too.


Snakes are an easy shape to make, so anything could become a snake. Even our food was snakes. I saw this fruit snake online and wanted to try making one, but we had already eaten all of our strawberries. Here's our snake made from banana, peach and sultanas on a skewer and one that we made using a (soy) sausage with sauce and mustard:


I printed out the game sheet on this page and E played her first game of Snakes and Ladders. She hasn't really played any board games before. We played through once properly (E won) and after that E was more interested in experimenting with the counters (coins) and dice and tracing her finger up and down the snakes and ladders.

Another new activity for E was threading pasta 'beads'. I had previously coloured some left-over penne and left it to dry. We didn't have a large needle and the yarn we used was a little fuzzy, so E needed help threading the pasta. She did quite well for a first go and we turned her thread of pasta beads into a snake by gluing some googly eyes to one end of the 'snake'.


Having seen this super-easy origami snake online, I just had to make some. I ended up making three of them. I drew on some eyes with a blue marker and glued in little forked tongues. Originally only two of them had tongues, but E said that the tongue-less one wanted to be like his friends. E had great fun playing with these paper snakes and they're much hardier than some of the other paper toys that I've made.


The weather here is getting hotter and drier now, so maybe we'll see a real snake soon. Hopefully not hiding in all the straw mulch that we've just added to the garden.

-Polly